What is Linksys Velop Mesh Whole Home WiFi System?
Traditional WiFi systems include a router connected to the modem. If you own a small home, then a single router can help you get internet connection on all devices. But if one has a bigger home, with multiple rooms and storeys, a single router fails to meet one’s internet needs. In such events, a whole home WiFi mesh system comes to the rescue. The whole idea of the mesh system is to have multiple WiFi access points. These access points (known as nodes in the Linksys Velop mesh system) are placed in various parts of the home. However, it has been observed that users face problems while setting up their mesh systems. Check out the information given below if you are also stuck in a similar situation.
Facing Linksys Velop Setup Problems?
Are you struggling to complete the Linksys Velop setup? The information provided on this web page will assist you in getting the configuration of your Linksys Velop whole home WiFi mesh system done in an easy manner.
Solution: Linksys Velop Setup Problems
To begin enjoying the internet signal in all the corners of your home using Linksys Velop WiFi mesh system, you need to set it up at your home. You can set up Linksys Velop bridge mode or router mode depending upon your requirements. If you are unable to complete the initial configuration of your mesh system, then we first want you to verify if you are using the correct steps to do this or not. Verify the same using the instructions provided below.
Linksys Velop Setup Guide
A Linksys Velop system can be set up in two ways:
Using Linksys Velop App
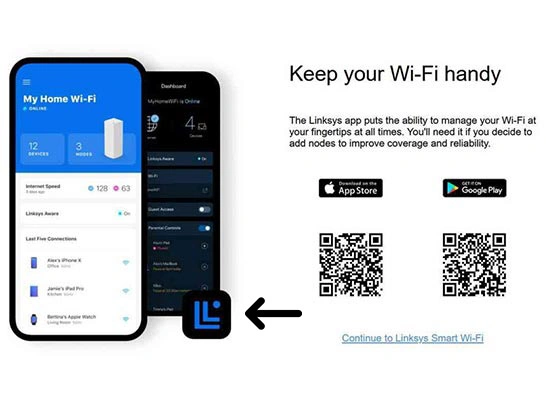
To set up your Linksys mesh system using the Linksys Velop app, you need to download the app on your smartphone. Then log in to it and follow the on-screen prompts appearing on the app.
Using Web-Based Interface
In this method, you need to log in to your Velop on a web browser and have access to its web-based interface. Here you need to execute some instructions to complete the setup process.
How to Setup Linksys Velop Using Linksys Velop App?

- Power on your modem and router and connect them using an Ethernet cable.
- Download the Linksys Velop app on your smartphone which is connect to the router’s network.
- Launch the app and tap on Launch Setup.
- Agree to the terms & conditions and the app will begin looking for the available node.
- Create an Account if do not have one.
- Assign WiFi name and Password to the node’s network.
- Give the node a name.
- Likewise, you can add all other child nodes.
This way you can easily complete the Velop setup using the LinksysVelop app.
We are sure that by using the correct instructions that have been given above, you will no longer be struggling with Linksys Velop setup problems.
How to Setup Linksys Velop Without App via Web Interface?
- Turn off the existing modem first.
- Disconnect it from the power supply.
- Make the connection between the modem and the router (Primary node) using an Ethernet cable.
Note: Any Linksys Velop node can be used as the Primary node while all other nodes will act as Child nodes. - Power on the modem.
- Plug the router into a well-working power socket.
- Wait till the LED turns solid.
- Grab your computer and connect it to the router’s WiFi.
- Launch an internet browser of your choice.
- Type 192.168.1.1 or linksyssmartwifi.com in the URL bar and press Enter.
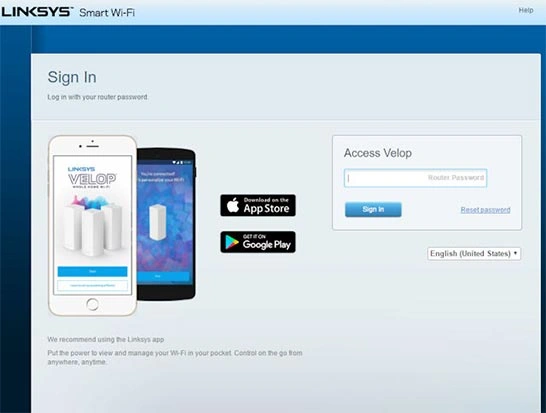
- A window will open up like this:
- Click on L on this image.
- Enter the default login password which is ‘admin’ and click on Sign In.
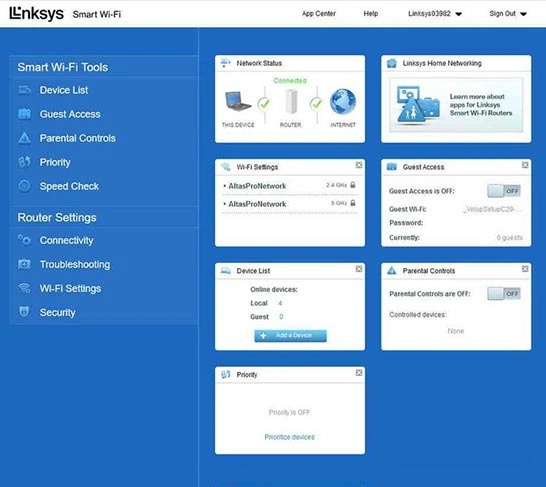
- Click on CA option available at the bottom of the dashboard that opens up.
- Under Router Settings, click Connectivity> CA Router Setup.
- You will be ask to assign a WiFi name(SSID) and WiFi password for your node. Do the same and click Setup Node.
- This will take a while. The light on the node will flash and then turn blue.
- Check the newly assigned WiFi name in the available networks on your computer and connect to it.
- After completing this, the system sends a message confirming that your Master Node is configure.
- Under CA Router Setup tab, you will get the option to add child nodes. Add all of them one by one.
Complete the Linksys Velop setup through the web-based interface by logging in with the Linksys Velop login.
How to Access Linksys Velop Login Page?
After completing the setup, log in to the Linksys web-based interface on a browser or the Linksys app to customize the settings. You can change the login username, password, WiFi name, WiFi password, and adjust all other options after logging in. However, if you set up Linksys Velop in bridge mode, features like Parental Controls, custom internal IP addresses, and other advanced settings remain disabled.
Here is how you can access the Linksys Velop login page and reach the dashboard:
- Ensure that your Linksys Velop is plug in and receiving a consistent power supply.
- Also, make certain that the primary node is securely connect to the modem.
- Launch a browser on a computer that is connect to Velop’s WiFi.
- Type linksyssmartwifi.com or 192.168.1.1 in the address bar and press the Enter key.
- Input the username/email address and password and click on Sign In.
- You are log in and accessing the Linksys Velop dashboard.
You can now tweak the settings the way you want.