How Do I Set Up Linksys RE7310 Extender?
If you want to install a Linksys RE7310 extender in your house, then you must be aware of the correct instructions to do that. Given in this blog are the complete details about the setup process of this very extender. FYI, it is an AX1800 dual-band WiFi range extender that tends to deliver WiFi speeds up 1800 Mbps. Keep reading.
Prerequisites: Setting Up a Linksys RE7310 WiFi Extender
Prerequisites: Setting Up a Linksys RE7310 WiFi Extender
- Your extender must be running on the default factory settings. Although a brand new WiFi extender comes configured with default settings, we recommend you reset it. The instructions for a factory default reset can be checked from the user manual.
- You must ensure that your main router is up and running. It is because if you do not do that, the RE7310 extender won’t connect to the internet and hence the dead zones will still remain dead.
- You can install your WiFi router using its designated app or the default IP address.
- Consider taking note of a few things. These include – WiFi name and password of your main router, SSID of your Linksys RE7310 extender. It is given on the label along with the default WiFi password. However, you must know that these details are crucial and case-sensitive.
How to Set Up Linksys RE7310 Extender?
Assuming that you are now aware of the prerequisites of installing the range extender, we are now mentioning the instructions to set up the extender. Walk through them carefully in order to avoid any problem:
- Plug the RE7310 extender into a wall outlet near the main router and wait for the light to blink orange.
- On your computer, open WiFi settings and connect to the network named Linksys Extender Setup – xxx using the WiFi password given in the user manual.
- Now, go to extender.linksys.com or Linksys extender login IP – 192.168.1.1.
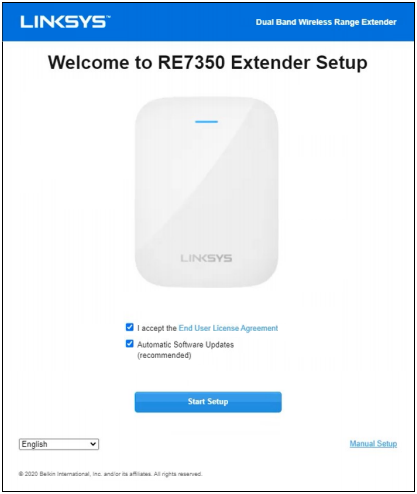
- You will reach the Setup wizard.
- Select Start Setup.
- In case, you need to skip the setup wizard, you can click the Manual Setup.
- On the next screen, click As a Wireless Range Extender and hit Next.
- Now, a screen asking you to select the Wireless network to be extended will show up.
- Just in case, you are extending the dual-band network, the WiFi names of both bands will appear.
- Enter the WiFi password when asked for.
- Have a look at the extended wireless network settings and select Next.
- You will see the _Ext in the extended network so that you can differentiate it from the main WiFi network.
- You will now be taken to the Spot Finder page that will help you pick an appropriate location for the Linksys RE7310 extender.
- Now, create an admin password for the extender and select Next.
- After registering the product using your email address, you will be able to view all the settings of the extender.
- The light on your RE7310 will turn solid blue.
- The extender is now set up.
This is how you can make your Linksys RE7310 WiFi range extender up and running. After the installation, you can access its network settings at extender.linksys.com on any device connected to its WiFi network.
The Final Thoughts
It is now time to wrap up the post that was all about installing the Linksys RE7310 extender. We are expecting that you have completed the installation of your extender successfully. Just in case, your router supports the WPS functionality, the setup of RE7310 will become a breeze for you. All you have to do is press the extender and router’s WPS button within a 2 minutes interval. Press buttons two times if you are extending dual-band networks.


