Linksys Velop Troubleshooting Guide for Connectivity Issues
It is very common to face connectivity issues with a Linksys Velop mesh system. Everyone knows that a Velop mesh system has WiFi units called nodes that work together to create a unified WiFi network. But, only a few users know how to troubleshoot the mesh network connectivity issues. Given in the blog are some tested and proven Linksys Velop troubleshooting techniques that you should follow to address the problem.
How to Perform Linksys Velop Troubleshooting?
1. Update the Firmware
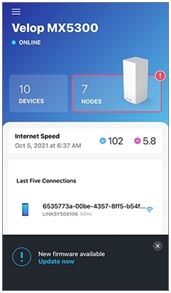
Like all other networking devices, Linksys nodes run on a firmware. The firmware controls every activity carried out with the help of the mesh network. Thus, it is very important to keep the Velop node updated. The steps to update the Linksys Velop node are mentioned below:
- Open the Linksys Velop app on your mobile phone.
- Log in to the app and reach the Velop dashboard.
- Now you should tap the Menu icon.
- The Menu icon is located on the upper-left side of the screen.
- Select Network Administration.
- Tap the Update Now link.
- The firmware update will start.
- Do not interrupt the firmware update by unplugging the Linksys Velop node from its respective socket.
- The firmware update will complete when the light on the top of the node will become solid blue.
2. Place the Nodes Correctly
The placement of the nodes matters a lot when it is about troubleshooting connectivity problems. Many users prefer placing their nodes very close so that they can communicate without many efforts. But, you must know that there is no need to keep nodes very close. They just need to be placed in each other’s range for an effective signal transmission. You are also advised to keep the following things or devices away from all Velop nodes:
- Bluetooth speakers, microwave ovens, televisions, refrigerators, treadmills, or other devices that emit electromagnetic frequencies
- Water coolers, geysers, aquariums, or similar objects
- Metal objects and objects that have metal polishing
- Walls, corners, and other masonry constructions
Use Non-Damaged Cable for Router-Modem Connection
May be the connectivity issue is a result of a damaged cable that is connected to your Linksys Velop router (primary node) and the modem. Therefore, if the cable is found damaged, you should replace it with a new one.
3. Set Linksys Velop Device Prioritization
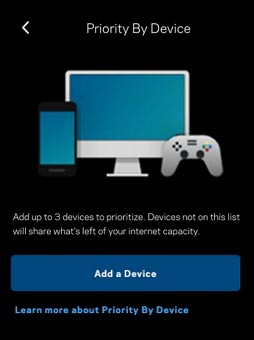
The Linksys Prioritization is a feature that lets a person give some devices a priority to connect to the internet via the Velop network. You can choose up to three devices. However, other devices will consume the remaining bandwidth.
You can prioritize devices on which you attend video conferences or devices that you use for online gaming. The feature can be activated using the Linksys Velop setup page or the Linksys app. Below, we have given the steps to configure it via the app:
- Log in to the Linksys mobile app.
- Tap the Menu icon the dashboard of your Linksys mesh Velop system.
- You need to tap Video Calls or By Device.
- If you choose Video Calls, you will be able to prioritize Zoom and Microsoft applications.
- Turn the feature ON.
- In case you select By Device, you will be prompted to add devices.
- Select 3 devices and save the changes.
- If you want to delete a device from the list, tap the Delete icon next to the Device name.
- Select Remove after that.
- Tap Change.
Make a Habit of Rebooting the Mesh System
Rebooting is one of the finest Linksys Velop troubleshooting techniques to fix connectivity issues. Thus, you should unplug all the Velop nodes from their power outlets and wait for 10 seconds. Reconnect them. This will surely give good results.
To Sum Up
Various factors create Linksys Velop connectivity issues. But, with the help of the above-given Linksys Velop troubleshooting tips, you will be able to fix them. If you still fail, you can reset the Velop system and set it up once again.


